
Do you want to know How to Build a WordPress Website From Scratch?
Whether you’re a small startup taking your first steps into entrepreneurship or an established company with years of experience, one fundamental truth remains unchanged. Every business needs a professional website to thrive and expand its presence in the digital landscape.
However, the thought of creating a website from scratch can be daunting, especially if you’ve never ventured into the realm of web design or lack experience with programming languages. Fortunately, WordPress.com makes building websites simple. In this article, let’s look at how to build a WordPress website from scratch even without having any idea about web development.
Welcome to our guide on How to Build a WordPress Website from Scratch? In this comprehensive tutorial, we’ll walk you through the step-by-step process of creating your own website using the powerful WordPress platform.
What is WordPress?
WordPress is a popular and widely used open-source content management system (CMS) and website-building platform. It is known for its flexibility, ease of use, and extensive customization options. WordPress is used by individuals, businesses, bloggers, and organizations to create and manage websites and online content. You don’t need to be a coding expert to build a website with WordPress.
Why should you use WordPress for your Website?
- WordPress is open-source software, meaning it’s free to use and can significantly reduce your website development costs.
- WordPress features a user-friendly interface that makes it accessible to individuals with little to no coding experience.
- WordPress offers a vast library of themes and plugins that allow you to customize the look and functionality of your website.
- Many WordPress themes are responsive, meaning they automatically adapt to different screen sizes and devices, providing a better user experience for mobile visitors.
- With plugins like WooCommerce, you can easily add e-commerce functionality to your WordPress site, allowing you to sell products and services online.
Buy Domain and Hosting
Before you dive into the exciting world of WordPress website creation, you’ll need two essential ingredients: a Domain name and Hosting.
Domain name: A domain name is a user-friendly, human-readable address used to access websites on the internet.
For example, wordpresszilla.com is a domain name that allows you to access the WordPresszilla website.
Here’s a breakdown of a domain name with an example:
- Domain: This is the main part of the domain name and usually represents the name of the website or organization. It can contain letters, numbers, and hyphens and is located to the left of the dot (period).
- Example: In the domain name “wordpresszilla.com,” “wordpresszilla” is the domain.
- Top-Level Domain (TLD): The TLD is the part of the domain name that appears to the right of the dot (period). It often indicates the type or purpose of the website. Common TLDs include .com, .org, .net, .gov, .edu, .co, and many others.
- Example: In the domain name “wordpresszilla.com,” “.com” is the TLD.
Each domain name is unique, and no two websites can have the exact same domain name and TLD combination. Domain names are registered through Domain Registrars, and website owners or organizations need to renew their domain registrations periodically to maintain ownership and continue using the domain.
When it comes to establishing a strong online presence, the choice of your domain and hosting provider is crucial. That’s where eHostingServer.com steps in as your trusted partner in the digital world. With a stellar reputation and a track record of delivering top-notch services, eHostingServer offers a compelling solution for all your website needs.
Now let’s talk a bit about Web Hosting
Web Hosting: Web hosting refers to the service of providing the infrastructure and resources needed to make a website accessible on the Internet. It involves storing the files, data, and content that make up a website on special computers called servers. These servers are connected to the internet, allowing users to access your website 24/7.
In simple terms, web Hosting is like renting space on the internet to store your website. Just as you need a physical location to open a shop, your website needs a place to exist online. Nothing can be more frustrating than trying to browse a website that loads slowly.
To ensure your website visitors have the best browsing experience possible, it’s crucial to invest in a reliable web hosting provider. When it comes to selecting from multiple web hosting providers for your WordPress website, our top recommendation is eHostingserver.com. For the best results and prompt support, eHostingServer.com is my ideal choice.
Whether you’re running a small blog or a large e-commerce site, eHostingServer.com offers hosting plans that can scale with your needs. Start small and grow as your website grows.Try eHostingServer.com risk-free. They back their hosting services with a money-back guarantee, so you can be confident in your choice.
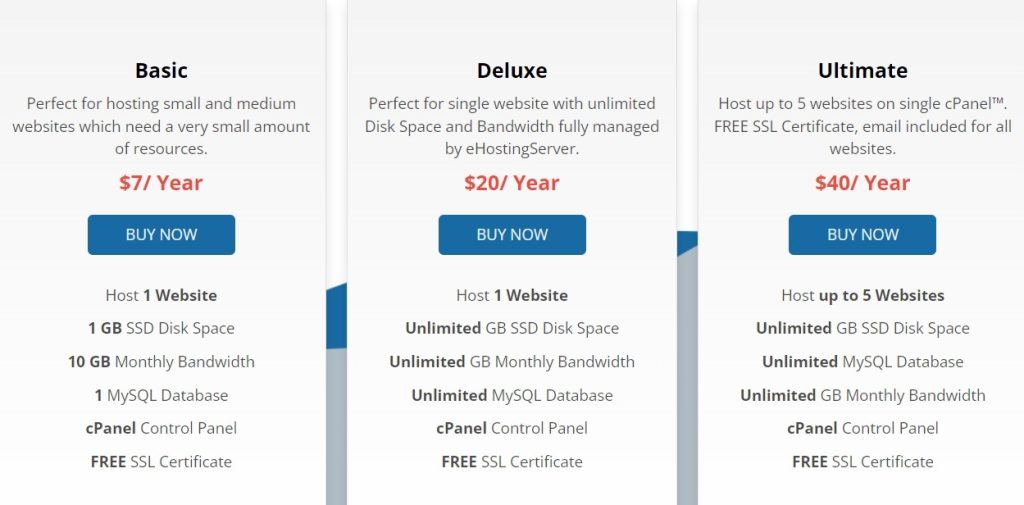
eHostingServer.com offers a range of hosting plans designed to cater to various needs and budgets. With plans starting at just $7 a year, it’s an accessible choice for students and beginners. You can explore their diverse range of hosting packages to find the perfect fit for your specific requirements.
Things to consider while buying Domain and Hosting
- Type of Hosting: Determine the type of hosting you need, such as shared hosting, virtual private server (VPS) hosting, dedicated hosting, or cloud hosting. Choose based on your website’s size, traffic, and specific requirements.
- Performance: Evaluate the hosting provider’s performance, including server uptime, speed, and reliability. Look for reviews and testimonials from other users.
- Scalability: Consider your future needs. Ensure the hosting provider offers scalable plans so you can upgrade as your website grows.
- Support: Check the availability and quality of customer support. 24/7 support can be crucial in the case of issues or questions.
- Data Centers: Consider the location of the hosting provider’s data centers. Choose data centers that are geographically closer to your target audience for better performance.
- Pricing: Understand the hosting provider’s pricing structure, including any renewal fees. Look for any hidden costs or restrictions.
- Money-Back Guarantee: Check if the hosting provider offers a money-back guarantee, allowing you to try their services risk-free.
- Backup and Recovery: Inquire about backup and data recovery options. Regular backups are crucial for data protection.
Searching for dependable and cost-effective hosting? Your search ends at eHostingServer.com! They boast impressive Google ratings, round-the-clock customer support, and hosting plans that start at $0.6 per month. Get started on your hosting journey with eHostingServer.com today! If you have any confusion about how to select the plan for your website, you can follow this blog”How to Select the Best Web Hosting Plan ?“
Install WordPress
Certainly! There are two primary methods for installing WordPress:
Manually and using an automated script provided by your web hosting provider. I’ll describe both methods :
Method 1: Manual Installation
Installing WordPress manually in cPanel involves several steps. Here’s a step-by-step guide:
Before starting, ensure you have access to your cPanel account and that your web hosting provider supports WordPress installation.
Step 1: Go to the official WordPress website at wordpress.org and download the latest version of WordPress.
Step 2: Upload WordPress to Your Hosting Account
- Log in to your cPanel account provided by your web hosting provider.
- Navigate to the “File Manager” in cPanel.
- Open the “public_html” directory (or a subdirectory if you want to install WordPress in a subfolder).

Step 3: Create a Database
- In cPanel, go to the “Databases” section and click on “MySQL Databases.

- Create a new database by entering a name and clicking “Create Database.”

- Create a MySQL user by scrolling down to “MySQL Users” and adding a new user.

- Add the new user to the database, assigning them the appropriate privileges (usually “All Privileges”).

Step 4: Configure wp-config.php
- In the “File Manager,” locate the WordPress files you uploaded earlier.
- Right-click on the “wp-config-sample.php” file and select “Edit.”
- Provide the database information you created earlier: Database Name, Database Username, Database Password, and Database Host (usually “localhost”).

- Save the file as “wp-config.php.”
Step 5:Run the WordPress Installation
- Open your web browser and go to your domain name (e.g., http://yourdomain.com).
- You will see the WordPress setup page.
- Select your language and click “Continue.”
- WordPress will ask you to enter some information:
- Site Title: The name of your website.
- Username: Choose a username for your WordPress admin.
- Password: Create a strong password for the admin user.
- Your Email: Provide a valid email address.
- Click “Install WordPress“.

Step 6: Complete the Installation
- After the installation is complete, click “Log In” to access your WordPress admin dashboard.
- Use the username and password you created during the installation.
- You’re now logged in, and you can start customizing your WordPress site.
Access your site through this URL: http://www.yourdomain.com/wp-admin. You should see something like this on your screen.
Method 2: Using the Softaculous App Installer.
Installing WordPress using the Softaculous Apps Installer in cPanel is a quick and straightforward process. Here are the steps to install WordPress using Softaculous:
Step 1: Log In to cPanel:
Log in to your cPanel account provided by your web hosting provider. You can log in to your cPanel account using your domain name: domainname.com/cPanel.

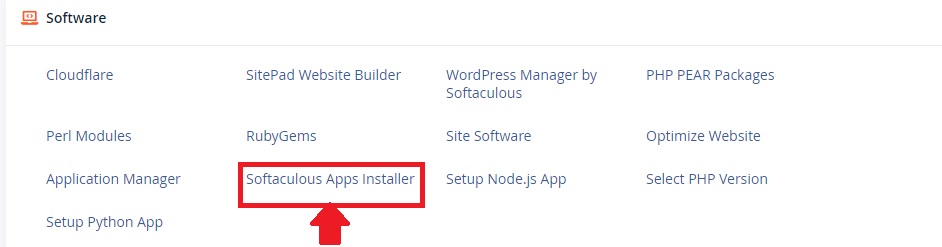
Step 2: Locate Softaculous
In your cPanel dashboard, scroll down to the “Software” or “Software and Apps” section. Look for the Softaculous Apps Installer icon.
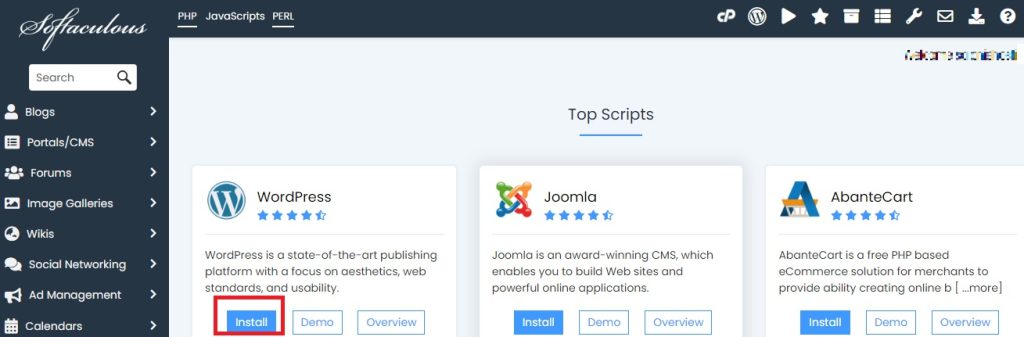
Step 3: Access WordPress Installation
- Click on the Softaculous icon to open the Softaculous Apps Installer interface.
- In the Softaculous dashboard, you will find various applications available for installation. To install WordPress, click on the WordPress icon
Step 4: Start the WordPress Installation
On the WordPress overview page, click the “Install Now” button to begin the installation process.
Step 5: Configure WordPress Settings
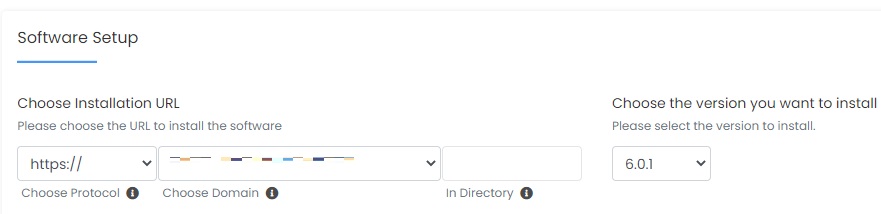
- Choose the installation URL: Select the protocol (HTTP or HTTPS) and the domain name where you want to install WordPress. If you want WordPress to be installed in the root directory (e.g., http://yourdomain.com/), leave the “In Directory” field empty.
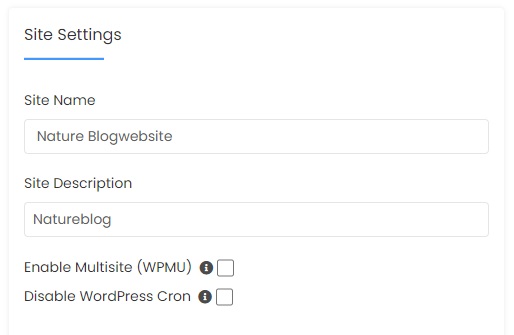
- Site Settings: Provide the site name and site description.
- Admin Account: Set the username, password, and email address for your WordPress admin account. You will use these credentials to log in to your WordPress dashboard.
- Choose Language: Select the language for your WordPress installation.
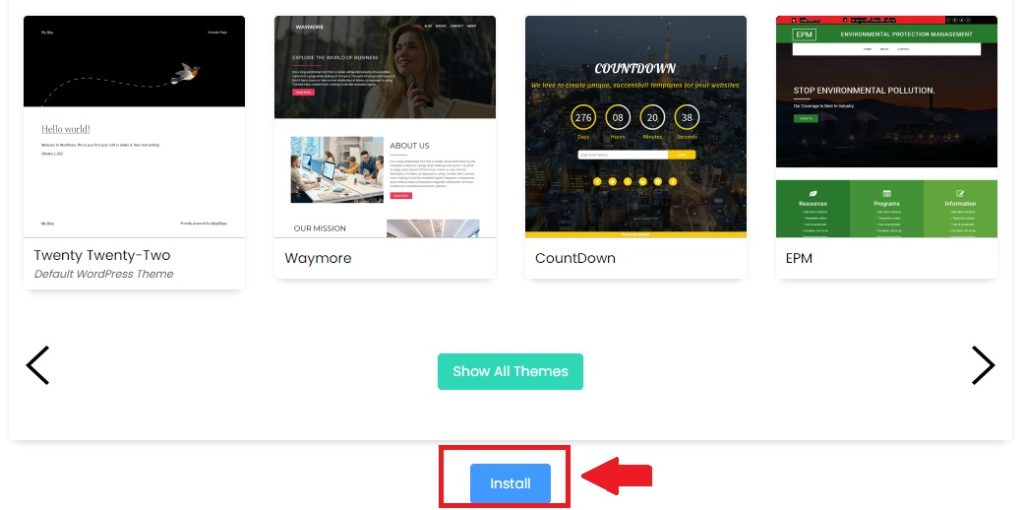
- Select Plugins and Themes: You can choose to install popular plugins and themes during the installation process. This is optional.
- Advanced Options: Here, you can change the database name, table prefix, and other advanced settings. However, it’s recommended to leave these as their default values unless you have specific requirements.
Step 6: Complete the Installation
- After configuring the settings, click the “Install” button to start the installation process.
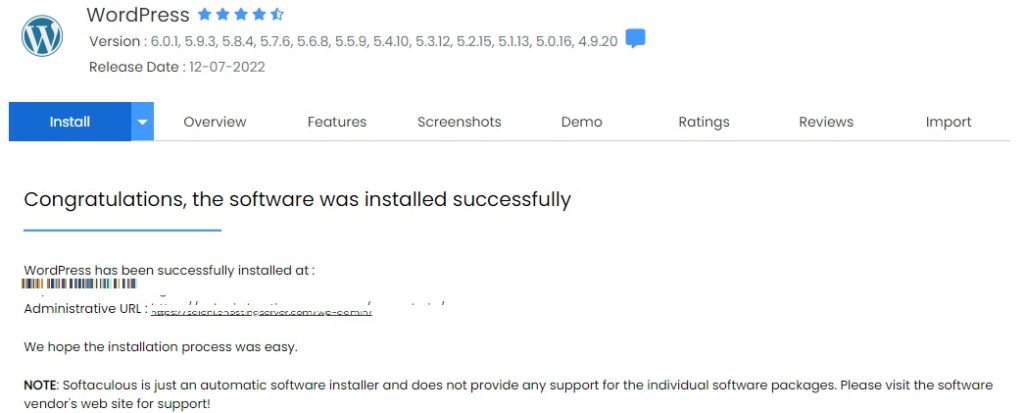
- Softaculous will now install WordPress using the settings you provided. Once the installation is complete, you will see a confirmation message
Step 7: Access Your WordPress Dashboard
- You can access your newly installed WordPress site by clicking on the administrative URL provided in the Softaculous confirmation message (e.g., http://yourdomain.com/wp-admin/).
- Log in using the admin credentials you set during the installation.
Congratulations! You’ve successfully installed WordPress using Softaculous in cPanel. You can now start customizing and building your website using the WordPress dashboard.
Some of the key things to do after installing WordPress
After successfully installing WordPress, there are several important steps and additional elements you can consider adding to enhance your website’s functionality, security, and design. Here are some of the key things to do after installing WordPress:
1) Choose a Theme: Select a WordPress theme that suits your website’s design and layout needs. You can choose from free themes available in the WordPress theme repository or opt for a premium theme for more advanced customization options.
2) Essential Plugins: Plugins add functionality to your WordPress site. Some essential plugins to consider include:
- SEO Plugin: Install an SEO plugin like Yoast SEO or Rank Math to optimize your website for search engines.
- Security Plugin: Enhance your site’s security with a plugin like Wordfence or Sucuri Security.
- Cache Plugin: Improve website speed and performance with a caching plugin like WP Super Cache or W3 Total Cache.
- Contact Form Plugin: Add a contact form to your site using a plugin like Contact Form 7 or WPForms.
- Backup Plugin: Implement a backup solution like UpdraftPlus to regularly back up your site’s data.
- Social Sharing Plugin: Make it easy for visitors to share your content on social media with a plugin like ShareThis or Social Warfare.
- Analytics Plugin: Monitor your website’s performance with a plugin like Google Analytics for WordPress by MonsterInsights.
- E-commerce Plugin (if applicable): If you plan to sell products or services, consider WooCommerce for e-commerce functionality.
3) Set Permalinks: Configure your site’s permalinks for SEO-friendly URLs. You can customize the permalink structure in the WordPress dashboard under “Settings” > “Permalinks.”
4) Create Essential Pages: Build essential pages for your website, including an “About Us” page, a “Contact” page with contact information or a contact form, and a “Privacy Policy” page for legal compliance.
5)Regularly Update WordPress, Themes, and Plugins: Keep your WordPress core, themes, and plugins up to date to ensure optimal security and performance. WordPress provides notifications when updates are available.
6)Configure SEO Settings: If you installed an SEO plugin, configure its settings to improve your website’s search engine visibility. This includes adding meta titles and descriptions to your content.
7) Secure Your Website: Strengthen your website’s security by using strong passwords, limiting login attempts, and following best security practices.
8) Content Creation: Start creating and publishing content that aligns with your website’s goals and audience. Consistent and valuable content is key to attracting and retaining visitors.
These steps will help you get started with building and managing your WordPress website effectively. Depending on your website’s specific goals and niche, you may need to explore additional plugins and customization options to meet your needs.
Wrapping Up
“In this comprehensive guide, we’ve explored the exciting journey of creating your very own WordPress website from scratch. It’s like building your very own online home! We began by picking a web address (domain name) and finding a trustworthy hosting partner, eHostingserver.com, to store our website files.
But remember, building a website is not just about the technicalities; it’s about sharing your passion, your ideas, and your unique voice with the world. As we finish this journey, remember the main idea: How to Build a WordPress Website from Scratch?
Thank you for joining us on this journey, and may your WordPress adventures be filled with success, creativity, and boundless opportunities.”